www.fneunemann.com

Measuring Strips (Page 2)

The planing form can be used as a 60° block or anvil. The depth at each station is known and the height of the strip above the form can easily be measured by a dial height gage.

Here are the results compared to the two previous methods:

Strip Waara V-Block Dial Gage w/60° Anvil Planing Form
1 .0485 .048 .049
2 .054 .054 .054
3 .0595 .059 .059
4 .065 .064 .065
5 .0695 .069 .070
6 .0745 .074 .075
7 .0775 .077 .078
8 .081 .081 .082
9 .086 .086 .087
10 .090 .0895 .091
11 .0895 .089 .0895
12 .090 .090 .091
13 .091 .091 .093
14 .095 .095 .096
15 .100 .0995 .101
16 .1035 .1035 .105
17 .1075 .108 .108
18 .111 .111 .111
19 .119 .119 .1205
20 .129 .1285 .129

For users of flat-soled planes, simply slide the strip one station to the left (for right handers) and read the height above the form. Add that height to the depth of the station for the thickness of the strip. There may be a slight loss in accuracy here due to both depth-of-form and height-above-form measurements being necessary, but the results are still acceptable.

For those using a grooved plane, knowing the height (which is consistent throughout its length) of the finished strip above the form makes it even easier, simpler, and quicker since it is never necessary to slide the strip or lift it from the form. (See A Gage For Grooves, in The Planing Form issue # 58) In both cases the height gage, along with a set of rods, remains the best way to set planing forms.
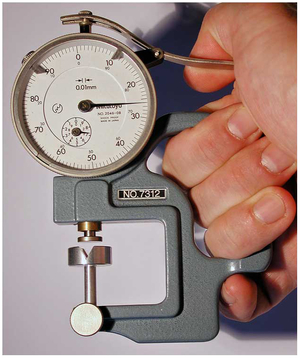
The modified Mitutoyo 7312 thickness gage

For the last tests the strips were separated into two groups, odd numbers for dial caliper and even numbers for micrometer. These measurements were made by participants at the Corbett 2000 meeting and the results (as measurement/variation) compared to others, follow:

Strip Waara V-Block Dial Gage w/60° Anvil Micrometer Dial Caliper
1 .0485 .048 .047 / 0
2 .054 .054 .052 / 0
3 .0595 .059 .057 / .001
4 .065 .064 .063 / 0
5 .0695 .069 .068 / 0
6 .0745 .074 .073 / .001
7 .0775 .077 .077 / .001
8 .081 .081 .079 / .001
9 .086 .086 .084 / .001
10 .090 .0895 .088 / 0
11 .0895 .089 .086 / .001
12 .090 .090 .088 / 0
13 .091 .091 .089 / .001
14 .095 .095 .093 / 0
15 .100 .0995 .098 / .001
16 .1035 .1035 .102 / 0
17 .1075 .108 .105 / 0
18 .111 .111 .109 / 0
19 .119 .119 .116 / .001
20 .129 .1285 .126 / 0

To top

Page 1 | 2 | 3

printed on  06.10.2024

Copyright by ©Frank Neunemann, 1996 - 2024