elevate your planingboard (page 2)
Not only is this much easier and less tiring than when you can't use your thumb, but as you gain confidence you'll find this is such a firm grip that gloves or finger cots are no longer necessary. Locating the planing form closer to the near edge of the board makes this holding technique easier and also creates room on the far side to lay a full-length strip of masking tape where you can write station numbers and half diameters. Rounding off the underside of the near edge increases the comfort factor. Spring clamps, such as those made by Pony, are now easy to use if desired.
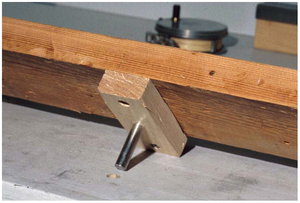
Placing the board on your bench can be done in many ways. One that works well is with 3/8" or 1/2" bolts, their threaded portion cut off, projecting through the underside of the blocks which are screwed to the board.
These bolts then fit into matching holes drilled into the bench such that the near edge of the board is close to or directly above the near edge of the bench. With such an arrangement the board can be dropped into place or removed quickly and easily.
Invest a few minutes in a fair trial of a board set at optimum height. With this new comfortable posture you'll find planing is easier and your results better.


