grooves n'stuff (page 3)
step 2:
Now, that the sole is nice and even, it's time for a thorough cleanup, (especially after having used a lubricant) and after that, to setup for putting the groove into the sole. You need the following materials:
1. Double sided adhesive tape or foil, available from stationary or hobby supply stores.
2. Shim stock of about the same thickness as the depth of the groove you are going to put in. To prepare a block plane for medium-fine work I use shim stock of 0.05 mm (0,002") thickness made of stainless steel or brass, available from machinery and tool supply stores. The thin shim stock material greatly helps to keep the sole of the plane as parallel to the working surface as possible. In most cases the setup stops cutting by itself and the work is done.
3. A few strips of masking tape and duct tape.
4. Three or four sheets of 180 grit sandpaper.
5. A bristle brush, about 2" wide, to remove the metal dust.
6. A dial depth gage, the one you use to set your planing form. Remove the 60° tip and replace it with a regular, ball-shaped one. Put it on an even, flat surface and set the dial and/or hand to zero.
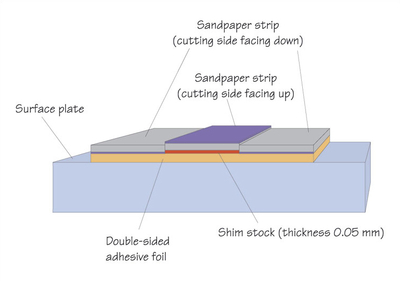
Clean the working surface and degrease it with acetone. Cut a strip of double sided adhesive foil, width equal to the width of the plane you work on, the length equal to the length of your working surface. Next cut the two outer strips of sandpaper and a strip of shim stock, width about 1/3 of the with of the plane, length equal to the length of your working surface.
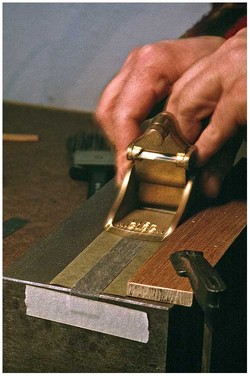
Fix the double sided adhesive foil to the working surface (avoid any pleats!) and remove the protective sheet from the upper side. Next fix one of the strips of sandpaper to the double sided adhesive foil layer, cutting side down (!). Next to that the strip of shim stock, then, the other prepared strip of sandpaper, cutting side down (see figure 3). Clamp a piece of wood (e.g. old ruler, a chunk of leftover straight wooden moulding, or whatever suitable you can find) to the working surface, next to the double sided adhesive foil / sandpaper sandwich. This will act as a fence and ensures a straight movement without sliding sideways. Now your the setup should look similar to the one shown in figure 2 and you are almost ready to get going.
Now cut at least 10 strips of sandpaper (same grit as the two strips fixed up side down!), width equal to the strip of shim stock, length equal to your working surface plus an inch or two, which are needed for fixing the strip to the sides of working surface on both ends, to allow quick and easy change when they get clogged (see Figure. 4). Put a strip on to of the shim stock strip with the ends protruding equally over the edges of the working surface, fold the ends down and fix them with a piece of masking or duct tape. Now you are ready to go.


